UV DTF printing has emerged as a practical, beginner-friendly option for producing vibrant transfers on textiles. As a core method within the direct-to-film workflow, it complements other digital textile approaches and expands color options. For beginners, this guide covers DTF printing for beginners, helping you select affordable equipment, set up a repeatable process, and learn by doing. With a focus on practical steps, you’ll learn about direct-to-film transfer, the essential DTF printing equipment, and best practices for safe, consistent results. You’ll also see how UV DTF vs standard DTF compares for color, durability, and workflow choices.
Think of this approach as a film-first transfer that uses UV-curable inks to anchor designs onto fabrics with heat. In practical terms, you’re imprinting artwork onto a specialty carrier, applying an adhesive layer, and then pressing the design onto garments—an expressive path within digital textile printing. This alternative terminology emphasizes the film-to-fabric workflow, the role of UV-curable systems, and the robust results you can achieve on cotton, blends, and more. As you explore beginner projects, consider using a variety of substrates and release films to understand adhesion, cure times, and long-term durability.
Understanding UV DTF Printing: The Basics in Direct-to-Film Transfer
UV DTF printing represents a specialized path within the direct-to-film transfer family, leveraging UV-curable inks or UV curing steps to boost color vibrancy and drying speed. For beginners, this means a workflow that can deliver high-detail transfers on a variety of textiles, from cotton tees to blends, with potentially faster turnaround times than traditional solvent or water-based routes. By framing UV DTF as part of the broader direct-to-film workflow, you can see how ink chemistry, film selection, and curing methods come together to create durable, professional-looking designs that hold up to washing and wear.
The key takeaway for aspiring designers and crafters is that UV DTF printing sits alongside other DTF options, offering distinct advantages in print quality and speed when used correctly. As you explore direct-to-film transfer, you’ll notice how UV-enabled systems can compress curing times and improve color saturation—especially on darker fabrics—while still requiring careful attention to equipment setup, film compatibility, and heat-press parameters. This introductory overview sets the stage for selecting the right path based on your budget, volume, and fabric choices.
Direct-to-Film Workflow Essentials for Beginners
A solid direct-to-film workflow begins with understanding the flow from artwork to transfer. You’ll design for a transfer area, print onto the DTF transfer film, apply an adhesive powder, cure or heat-set the powder, and then press the film onto the garment. Emphasizing the direct-to-film workflow helps you anticipate how each step—from ink type to powder adhesion and final heat press timing—impacts overall durability and image fidelity. For beginners, embracing this sequence reduces guesswork and supports repeatable results.
In practice, this means starting with small swatches and simple designs, using a reliable DTF printing equipment setup, and following manufacturer guidelines for curing and pressing. A repeatable routine—print, powder, cure, align, press, and peel—helps you build confidence and minimize waste as you learn how film type, ink formulation, and fabric weave interact with your chosen workflow. By treating each project as a learning experiment within the direct-to-film workflow, you’ll accumulate practical knowledge faster.
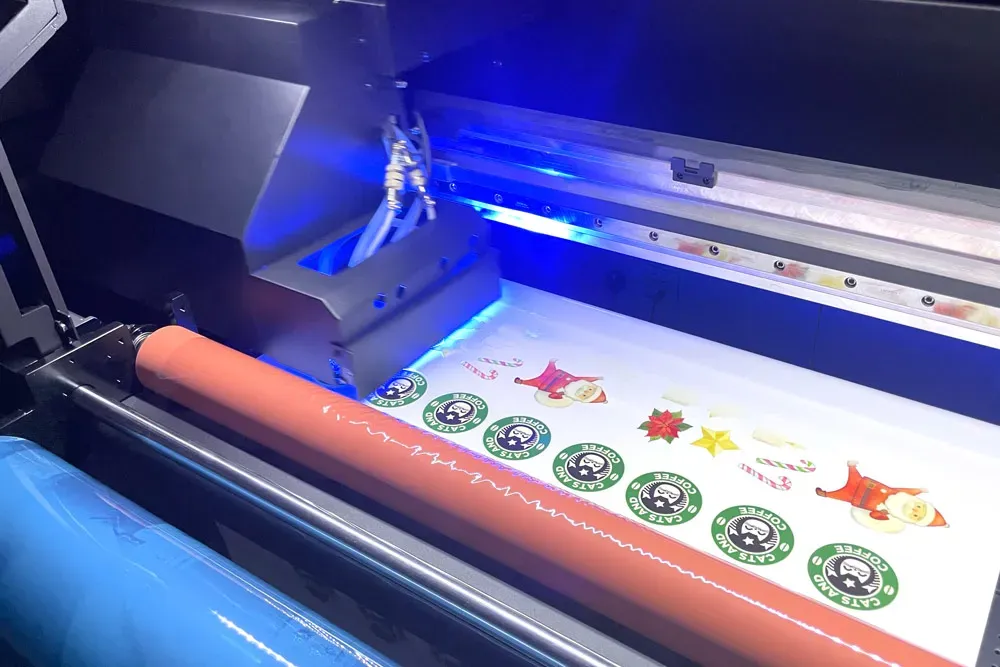
Choosing DTF Printing Equipment for UV-Driven Projects
Selecting the right DTF printing equipment is foundational for consistent, repeatable results. For beginners, a reliable printer capable of handling DTF inks or UV-curable inks, coupled with a capable RIP, often provides a solid balance of performance and cost. The emphasis on “DTF printing equipment” means prioritizing equipment that supports stable color management, accurate alignment, and dependable curing options, whether you choose a dedicated UV DTF setup or a standard DTF system with a UV-curing module.
Beyond the printer, you’ll need transfer film designed for DTF, heat-resistant release film, an adhesive powder, a heat press suitable for textile work, and basic design software. While it can be tempting to chase the latest gadget, a careful starter kit that emphasizes consistent results and safe operation will pay dividends. Understanding your chosen path—whether it centers on UV DTF printing or a traditional DTF workflow—helps you select compatible films, powders, and cure methods that yield durable transfers.
Design and Color Management for Direct-to-Film Printing
Artwork preparation is critical for high-quality DTF transfers. Aim for 300–600 dpi resolution to balance detail with practical processing time, and work in a color-managed workflow using calibrated monitors and ICC profiles to minimize shifts between on-screen designs and printed film. When the design will ride on dark fabrics, plan for a white underbase to ensure colors pop after transfer, and consider safe zones and bleed to account for misregistration during pressing.
File management also matters: use vector for logos and text where possible, embed or outline fonts, and pair raster imagery with appropriate resolution. This focus on design and color management ties directly into the broader direct-to-film transfer process, helping you maintain crisp edges, accurate skin tones, and faithful color reproduction across a range of fabrics. By aligning your artwork with the capabilities of your DTF printing equipment and film, you create a strong foundation for repeatable, studio-quality results.
Troubleshooting UV DTF vs Standard DTF: Common Pitfalls and Fixes
When comparing UV DTF printing to standard DTF, key differences emerge in curing speed, ink saturation, and sharpness on challenging fabrics. Common issues include color misregistration, faded colors, or uneven adhesion, which can be more pronounced if curing times or temperatures aren’t optimized for the film and ink in use. Understanding these distinctions helps beginners choose between a UV-focused path and a traditional DTF approach based on material types, design complexity, and production volume.
Practical fixes involve methodical testing: verify alignment with test swatches, adjust heat-press temperature and pressure, and confirm that the transfer film and adhesive powder are compatible with both the fabric and ink system. Regular maintenance—cleaning printheads, checking film paths, and recalibrating the RIP—mitigates downtime and preserves color accuracy. By building a habit of small, controlled tests, you can rapidly identify the settings that produce consistent, high-quality results across your direct-to-film transfers.
Launch Your First Projects: From Concept to Production in DTF
Starting with simple designs that test color coverage and adhesion on a few fabric types helps you validate the fundamentals of the DTF printing process for beginners. Document every setting you use for each test, including ink or curing parameters, powder application, and pressing times, so you can reproduce successful results. Building a small library of test garments and swatches gives you a practical reference that accelerates iteration as you expand to more complex designs and larger print areas.
As you gain confidence, you can diversify fabrics, expand color palettes, and refine your workflow to handle higher volumes. Keep refining your process, maintain clear records, and stay aligned with the core concepts of direct-to-film workflow. With patience and consistent documentation, you’ll develop a reliable, scalable UV DTF or standard DTF printing routine that supports both hobby projects and small business production.
Frequently Asked Questions
What is UV DTF printing and how does it fit into the direct-to-film transfer workflow?
UV DTF printing uses UV-curable inks or UV curing steps to produce vibrant transfers on textiles. In the direct-to-film transfer workflow, you print the design onto a transfer film, apply adhesive powder, cure, and then press the film onto fabric. The UV aspect can improve color vibrancy, drying speed, and image sharpness compared with traditional DTF.
How does UV DTF printing compare to standard DTF for beginners?
UV DTF printing can offer faster curing, higher color saturation, and crisper detail, especially on dark fabrics. Standard DTF is typically more affordable upfront and often simpler to set up for beginners. Start with standard DTF to learn the workflow, then explore UV options as you scale.
What basic DTF printing equipment do I need to start with UV DTF printing?
A beginner-friendly setup includes DTF printing equipment: a printer capable of UV-curable or UV-compatible inks (or a standard DTF printer with a UV-curing option), DTF transfer film, heat press, adhesive powder, and a curing unit or UV lamp if needed. You’ll also want a reliable RIP, color management software, and basic design tools. Regular maintenance supplies should be on hand for long-term reliability.
What is the typical direct-to-film workflow for UV DTF printing from design to transfer?
Create or prepare your artwork, print onto the DTF transfer film with the UV DTF printing workflow, apply adhesive powder and cure as required, then place the film on the garment and press at the recommended temperature and time. Peel the carrier when cool or hot as specified, and inspect for color depth and alignment. Repeat or rework areas as needed.
What design considerations should I follow when preparing artwork for UV DTF printing?
Aim for 300–600 dpi for most designs and work in a color-managed workflow with calibrated displays. Plan a white underbase for dark fabrics, maintain safe zones and bleeds, and embed fonts or use outlines. Use vector art for logos and text when possible to keep edges crisp on transfers.
What are common troubleshooting tips for UV DTF printing and how can I fix them?
If colors look faded, check ink coverage, film compatibility, and color management; ensure proper white underbase. If adhesive powder won’t adhere, verify curing and even powder distribution. For misregistration, check alignment of the printer, film, and heat press; for cracking, adjust heat, pressure, and dwell time. Test on similar fabrics before production.
| Topic | Key Point | Practical Takeaways |
|---|---|---|
| Introduction | UV DTF printing is a workflow within the DTF family that enables vibrant, durable textile transfers; beginner friendly with a simple, repeatable process. | Ideal for small projects; focus on fundamentals and practice. |
| What you’ll learn | Overview of UV DTF printing, how it works, essential equipment, design considerations, a step by step workflow, troubleshooting, and practical guidance. | Actionable, plain language guidance; start with small tests and iterate. |
| Basics | Direct to film involves printing on film, applying adhesive powder, and transferring with heat; UV adds curing to boost vibrancy and drying speed. | UV DTF sits within the DTF family with potential print quality and speed benefits. |
| How it fits | DTF is one of several digital textile methods; transfer path differs from DTG and sublimation; start with swatches to learn variables. | Learn how film, ink, powder, and heat settings interact with fabrics. |
| Equipment | Printer capable of UV inks or a standard DTF printer with UV curing option; transfer film, heat resistant release film, backing sheet; adhesive powder; heat press; design software plus RIP; cleaning supplies. | Invest in a reliable starter kit; prioritize consistency and safety. |
| Design and File Setup | Artwork resolution 300–600 dpi; color management with calibrated monitor and ICC/DSC; white underbase for dark fabrics; safe zones and bleed; file formats see logos/text in vector, photos in raster; fonts embedded or outlined. | Maintain a color managed workflow from design to print. |
| Step-by-Step Workflow | Eight steps from design to transfer: prepare artwork, set up printer, print on film, apply adhesive powder, cure, place film on garment, press, peel, finish. | Follow a repeatable process and test prints; document results for consistency. |
| Troubleshooting | Faded colors, powder adhesion issues, cracking or peeling, misregistration, and bleeding are common; diagnose by checking ink coverage, film compatibility, curing, and alignment. | Use proper settings and fabrics; run tests on similar materials to minimize issues. |
| Maintenance and Safety | Regular cleaning of heads and rollers, safe handling of inks and powders, adequate ventilation, recalibrate RIP, keep spare parts. | Establish routine to minimize downtime and maintain print quality. |
| UV DTF vs Standard DTF | UV workflows can offer faster curing, higher color saturation, and sharper detail, especially on dark fabrics; UV requires compatible inks, curing equipment, and films; beginners may start with standard DTF. | Choose path based on budget and needs; scale to UV gradually. |
| Getting Started | Begin with simple designs to test color, coverage, and adhesion across fabrics; document settings and results. | Create a library of tests and reference materials for future projects. |
Summary
UV DTF printing offers an accessible entry point into direct to film transfer workflows, delivering durable, vibrant results across a range of fabrics. By understanding the basics, selecting the right equipment, preparing well designed artwork, and following a repeatable workflow, beginners can produce professional looking transfers on T shirts, hoodies, bags, and more. With practice, documentation, and incremental learning, you can scale from small tests to larger, more complex designs, building a reliable UV DTF printing workflow that fits your creative goals and business needs.